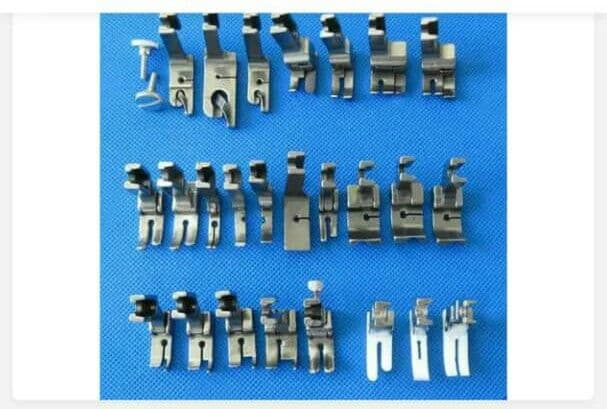
13 Must-Know Presser Feet Types and When to Use Them
"My presser foot keeps slipping off. I bought a zipper foot but I think I'm using it wrong. When do I need which foot?"
This question comes up constantly.
Most beginners don't realize that sewing machines come with multiple presser feet for a reason: each foot is designed for a specific type of stitching or fabric. Using the wrong foot can make projects harder, damage your needle, or produce uneven stitches.
The good news? You don't need to memorize all 13 types today. Once you understand what each foot does and when to use it, choosing the right one becomes automatic.
Here's a complete guide to 13 essential sewing machine presser feet, what they're designed for, and when you'll actually need them in your projects.
1. All-Purpose Foot (Standard Foot) — Your Everyday Workhorse
What it looks like: Flat with a rectangular opening in the center and two toes beneath.
What it does: This is the foot that comes with every sewing machine. It handles straight stitches, zigzag stitches, and most decorative stitches. It's the foot you'll use for 90% of your sewing.
When to use it: Everyday seams, decorative stitching, simple projects. If you're not sure which foot to use, start with this one.
Projects: Pillowcases, tote bags, basic kurtis, simple skirts, home décor stitching.
2. Zipper Foot — Stitch Close to Zipper Teeth
What it looks like: Narrow foot with an opening on one side only (usually the left). Some machines have a two-position zipper foot you can slide left or right.
What it does: A zipper foot lets your needle stitch extremely close to zipper teeth, piping cord, or other bulky materials without bunching or skipping stitches.
When to use it: Any time you're inserting a zipper—dresses, bags, cushion covers, home décor items.
Why it matters: Without a zipper foot, your stitches end up too far from the zipper, creating a gap or allowing the zipper to bunch. With the right foot, you get a professional, neat finish.
3. Buttonhole Foot — Create Perfect, Uniform Buttonholes
What it looks like: Larger than standard feet, sometimes with a slot on one side for a button to rest in.
What it does: On automatic machines, this foot creates a complete buttonhole in one step. On manual machines, it helps guide the four-step buttonhole process evenly.
When to use it: Any garment with buttons—shirts, kurtis, dresses, blouses, baby frocks. Nearly every project with buttons uses this foot.
The difference it makes: Without this foot, buttonholes come out uneven or wrong-sized. With it, every buttonhole matches perfectly, giving your garment a professional appearance.
4. Button Sewing Foot — Attach Buttons by Machine
What it looks like: Flat, transparent foot with special grips designed to hold a button in place.
What it does: Holds a button securely while a zigzag stitch attaches it to fabric. No hand-sewing required.
When to use it: Bulk button attachment (when you have 10+ buttons to attach) or when you want perfect, evenly-spaced button stitches.
Time-saver: Attaching 20 buttons by hand takes an hour. With this foot, it takes 10 minutes. Essential for bulk tailoring or boutique work.
5. Overlock Foot — Finish Fabric Edges Like a Serger
What it looks like: Foot with a side bar or guide on one edge.
What it does: Creates an overcast stitch that finishes raw fabric edges, preventing fraying. Works like a mini overlock machine.
When to use it: Finishing seam edges on knits and wovens. Essential if you don't own a serger/overlocker.
Projects: Dresses, blouses, stretch fabrics, any garment where raw edges need finishing for durability.
6. Rolled Hem Foot (Pico Foot) — Create Delicate Rolled Hems
What it looks like: Narrow foot with a curved groove.
What it does: Automatically rolls the fabric edge as you stitch, creating a narrow, delicate hem without hand-folding.
When to use it: Hemming lightweight fabrics like chiffon, dupatta, saree borders. Creates professional thin hems in delicate fabrics.
Why it's special: A rolled hem by hand takes forever. With this foot, you get perfect thin hems in minutes.
7. Embroidery Foot — Control Free-Motion Stitching
What it looks like: Open-toed foot with a spring mechanism, often wire or plastic.
What it does: Spring-loaded foot that bounces up and down, allowing free fabric movement in any direction. Used with feed dogs lowered.
When to use it: Free-motion embroidery, thread painting, quilting designs, darning holes, any decorative technique requiring controlled fabric movement.
Skill level: Intermediate to advanced. Requires practice but opens creative possibilities.
8. Satin Stitch Foot — Prevent Bunching on Decorative Stitches
What it looks like: Transparent, wide opening, special groove underneath.
What it does: Specially designed groove prevents thick decorative stitches from bunching or puckering. Used for satin stitches, appliqué, dense decorative patterns.
When to use it: Borders on kurtis, appliqué work, satin stitch decorations, baby frocks, any dense decorative stitching.
Result: Clean, even decorative stitches without fabric bunching underneath.
9. Gathering Foot — Create Even Gathers and Pleats
What it looks like: Foot with special mechanism to bunch fabric as you stitch.
What it does: Automatically creates evenly-spaced gathers or pleats as you sew. Gathers one layer while attaching it to a flat layer.
When to use it: Lehenga skirts, gathered curtains, ruffled home décor items, frocks with gathering details.
Time-saver: Hand-gathering takes forever. This foot does in minutes what would take an hour by hand.
10. Edge Joining Foot — Align Seams Perfectly
What it looks like: Foot with a thin metal guide in the middle.
What it does: Guide keeps your needle stitching exactly between two edges (like joining lace to trim), creating perfectly aligned seams.
When to use it: Saree border attachment, lace joining, decorative border stitching, home décor (curtain trim, cushion edging).
Why it matters: Keeps decorative borders perfectly aligned instead of shifting to one side.
11. Quilting Foot — Sew Through Multiple Thick Layers
What it looks like: Foot with a deep groove or spring mechanism, often with a tall shank.
What it does: Designed for stitching through thick, padded layers without skipping stitches or breaking needles.
When to use it: Quilted garments, padded jackets, thick bedspreads, any project with multiple fabric layers.
Prevents: Needle breakage, skipped stitches, and uneven feeding on thick materials.
12. Single Footer — Stitch Piping and Edge Trim Closely
What it looks like: Narrow foot similar to zipper foot, with opening on one side.
What it does: Stitches extremely close to piping, cording, or edge trim without hitting the cord.
When to use it: Piping on cushions, edge trim on garments, binding attachment, professional finishing.
Projects: Cushions with piping, handbags with trim, dresses with decorative edging, kurtis with ribbon trim.
13. Ruffler Foot — Create Automatic Pleats and Gathers
What it looks like: Complex foot with a mechanical mechanism and adjustment dial.
What it does: Creates perfectly-spaced pleats or gathers at preset intervals while stitching. Can handle lightweight to medium-weight fabrics.
When to use it: Frocks, skirts, lehengas, kids' wear, home décor (curtains, cushions) with regular pleat or gather spacing.
Why professional tailors love it: Ensures uniform gathers every time. Perfect for production work or bulk orders.
Before You Buy or Use Any Presser Foot
Check your machine's manual first. Not all presser feet are compatible with all machines. Some machines use snap-on feet, others use screw-on attachments. Older machines might use different shank heights.
Take a photo of your current foot, note your machine brand and model, and match it to the compatible feet before purchasing. You don't want to buy a foot that won't fit your machine.
The ONSA Philosophy on Presser Feet
Most beginners start with only the feet that came with their machine. That's fine—you can complete basic projects with just an all-purpose foot. But as your skills grow, specialty feet become your shortcuts to professional results.
In ONSA's courses, students learn not just how to use each foot, but when and why to choose it. This decision-making process is exactly what separates hobbyists from professional tailors.
First, master the 7 essential stitch practices with your all-purpose foot. Then, as you tackle new projects, learn the specialty feet that will make them easier.
Start With These 5 Essential Feet
If you're building your presser foot collection, don't buy all 13 at once. Start with these five, which cover 95% of common sewing tasks:
- All-purpose foot — You probably already have this
- Zipper foot — Essential for any garment with zippers
- Buttonhole foot — Necessary for buttons (nearly every project)
- Satin stitch foot — Opens up decorative possibilities
- Rolled hem foot — Perfect for delicate hems on lightweight fabrics
Add others as your projects require them. For example, if you decide to make quilted jackets, then add the quilting foot.
Frequently Asked Questions
The Right Foot Makes All the Difference
A zipper foot doesn't just make zippers easier—it makes them look professional. A gathering foot doesn't just speed up the process—it ensures uniform gathers every single time. A buttonhole foot doesn't just create buttonholes—it creates perfect, matching buttonholes.
The difference between a homemade-looking garment and a boutique-quality garment often comes down to small details like this. And those details come from understanding your tools.
Once you understand what each presser foot does and when to use it, you're no longer limited to simple projects. You're ready to tackle anything—zippers, buttonholes, gathering, intricate decorative work, and professional finishing touches.
Ready to learn how to master these feet through structured guidance? Connect with the ONSA team.