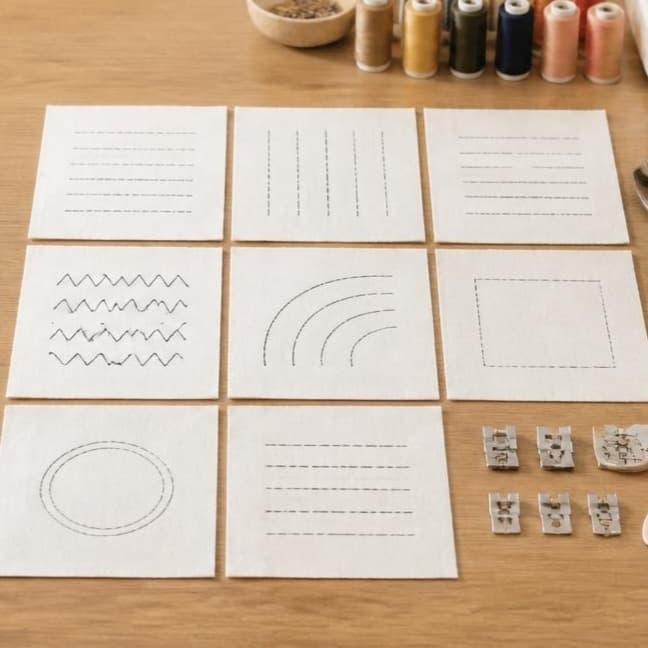
7 Essential Stitch Practices Every Beginner Must Master
"I've been practicing straight stitches for two weeks and they're still wobbly. Why is this so hard?"
Every week, ONSA's mentors hear this from beginners. And every time, the answer is the same: You're practicing, but you might not be practicing the right way.
Learning to stitch isn't about stitching for hours until your fingers hurt. It's about deliberate practice on the right exercises, building muscle memory, and understanding what "even stitches" actually feel like under your fingers.
The difference between a beginner who struggles for months and one who develops real confidence in weeks? They practice these 7 stitch exercises in order.
1. Straight Line Stitches — Master Your First Control
Before you touch your sewing machine, start here.
Take a piece of paper and draw straight lines with a pen. Now, using a sewing machine (without thread first), try to stitch along those lines. This teaches you the most important skill: controlling fabric movement with your hands while the machine maintains speed.
This single practice removes the fear of the needle. Once you're comfortable guiding paper without thread, add thread and repeat. You'll notice:
- How fabric needs to move steadily under the presser foot
- What "seam allowance" means in your hands
- How speed affects stitch evenness
- Why your first attempt was wavy (and how to fix it)
Time investment: 20-30 minutes, 3-4 times. You'll feel the difference by day 2.
2. Vertical & Horizontal Lines — Build Directional Confidence
Once straight lines feel steady, practice lines in different directions.
Draw vertical lines (top to bottom), horizontal lines (left to right), and combinations on paper. The reason? Your hands move differently in each direction. Vertical stitching requires different hand positioning than horizontal work.
This practice builds what experienced tailors call "directional muscle memory." Your hands learn that left-to-right stitching feels different from top-to-bottom, and you adjust your speed and hand position automatically.
Pro tip: Use a ruler and draw parallel lines 1cm apart. Try to stitch between the lines without crossing them. This teaches precision—a skill that separates wobbly seams from professional ones.
3. Zigzag Stitches — Control Sideways Needle Movement
Straight stitches are just the beginning. Now introduce zigzag.
Switch your machine to zigzag stitch and practice on paper. You'll notice something new: the needle moves side-to-side while you move the fabric forward. This requires a different kind of coordination.
Why is zigzag essential? Because once you master it, you understand how your machine creates any decorative stitch. Zigzag is the foundation for elastic stitching, overcast stitches, and nearly every decorative pattern.
What to look for: Even zigzags mean the stitch width is consistent. Uneven zigzags mean you're moving the fabric too fast or too slow relative to the needle's side-to-side movement.
4. Curved Lines — Practice Smooth Transitions
After you've mastered straight and zigzag stitches, curves come next.
Draw smooth curves on paper—think gentle circles and S-shapes. Now stitch along them. This teaches you how to make smooth turns without sharp angles or puckering.
Curved stitching is essential for:
- Armholes and necklines
- Collars and curved seams
- Decorative stitch lines on garments
- Any garment with soft, flowing edges
Key learning: Curves require you to rotate the fabric slowly while stitching. The needle stays in the same place (roughly), and you guide the fabric's curve under it. This is completely different from straight-line stitching.
5. Corner Pivoting — Master the 90-Degree Turn
This is where many beginners panic: How do you stitch a sharp corner without wobbling or breaking thread?
Draw a box on paper. Now stitch along the outline, stopping exactly at the corner. Here's the technique:
- Stop before the corner — Leave about 1cm before the corner point
- Lower the needle — Use the hand wheel to push the needle into the fabric at the exact corner
- Lift the presser foot — This releases the fabric from pressure
- Rotate the fabric — Turn it to align with the new direction
- Lower the presser foot — Resume stitching in the new direction
Once you master this pivot, you've unlocked the ability to stitch:
- Square pillowcases
- Box corners on bags
- Straight seams on garments
- Any project with clean, sharp edges
6. Circle Stitching — Build Continuous Smooth Control
Draw concentric circles on paper (one inside another, all centered). Stitch along each circle from outside to inside.
This practice does something special: it teaches continuous, smooth movement without stopping or pivoting. Your hands learn to work together to rotate fabric smoothly while maintaining even stitch length.
Why does this matter? Circle stitching builds the muscle memory you need for:
- Free-motion embroidery (if you advance to that)
- Smooth, continuous seams
- Decorative stitch patterns
- Hand-eye coordination between hands and feet
7. Backstitch Practice — Lock Your Threads at Start & End
The final essential stitch practice: backstitching.
Many beginners skip this or do it wrong, which is why seams come undone. Backstitching (stitching in reverse for 3-4 stitches at the start and end) locks your thread so it never unravels.
Practice this simple sequence:
- Position fabric — Place it under the presser foot at your starting point
- Stitch forward — Make 3-4 stitches in your normal direction
- Press reverse — Hold the reverse button and stitch backward over those same stitches
- Release and continue — Release reverse and stitch forward normally
- At the end — Repeat this process (stitch forward, then reverse 3-4 stitches) before lifting the presser foot
This simple practice prevents seam failure and is essential for every garment you'll ever make.
The ONSA Philosophy on Stitch Practice
At ONSA, we believe that rushed practice creates bad habits that take months to unlearn. That's why our Beginner's Tailoring Course dedicates an entire module to stitch practice before you ever touch a garment pattern.
Every student spends time on these exact 7 practices—on paper first, then fabric. Not because we're being slow, but because confidence with stitches means confidence with everything else. A student who has truly mastered straight stitches will sail through garment construction. One who skipped practice will struggle for months.
Your hands know the difference. Trust the process, and your stitches will follow.
Once you've mastered these 7 stitch practices, the next step is understanding which specialized presser feet can enhance different stitching techniques. A zipper foot changes how you stitch curves, an embroidery foot opens up free-motion possibilities, and more. Learn how to match your newly-practiced stitches with the right tool.
Frequently Asked Questions
Your Stitch Practice Starts Today
Every confident tailor practiced these exact exercises. Every designer who can stitch a perfect seam started with straight lines on paper.
You don't need expensive fabric or a fancy machine. You just need these 7 practices, consistency, and a little patience.
If you're looking for structured guidance as you practice—video lessons that show these techniques, mentors who review your work, and a community of beginners practicing alongside you—that's exactly what ONSA's courses are built for.
Ready to practice with purpose? Connect with the ONSA team on WhatsApp.